# Mpesa Integration part 1: Setup
You are about to learn how to integrate M-Pesa (opens new window) payment option to your application. In a series of articles we will step through the process of setting up mpesa developer account, stay clear of the pitfalls that you might run into and ship to production while following best practises.
Whilst your application might not urgently need such integrations, we will go through several patterns and learn some clean ways to clip external data to your projects. If you haven't worked with the Mpesa API before, you will see that it brings lots of challenges and weirdness that require us to be extra vigilant to the organization of our code.
In this first article, we will define our development environments, setup our models, and lay the specification of our application.
# Some first requirements
Before diving into the code, let's step back and define the very first specifications of our application.
- It is unlikely that our users might have multiple customer accounts. Therefore, we should create a customer account for our users upon registration and map their details into our customer model.
- We should also keep track of the transactions & their reversals for analytics. This will help in improving our services & stay ahead of the competition.
- Finally we want to manage our customers and link them with the mpesa transactions they've made.
Looks like we've found our models.

# Models
# User
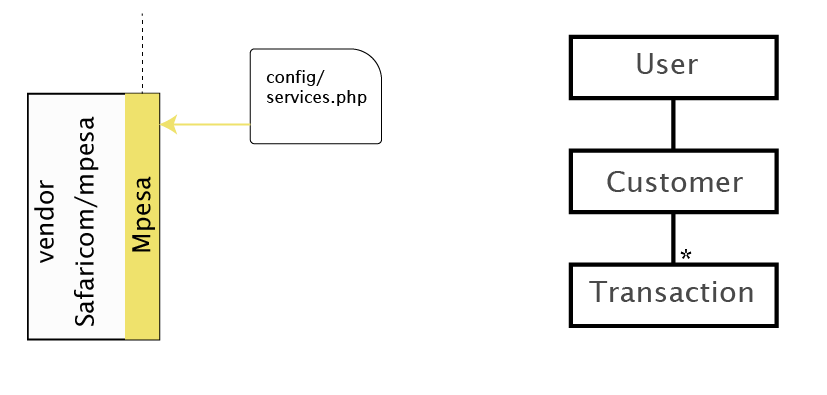
The user model stays the same but gets a hasOne relationship to the Customer model.
class User extends Authenticatable
{
    // ...
    public function customer()
    {
        return $this->hasOne(Customer::class);
    }
}
# Customer
Our simplified Customer model will have a name and email, attribute that will be mapped from the user account.
class Customer extends Model
{
   protected $fillable = ['name', 'email'];

   public function transactions()
   {
      return $this->hasMany(Transaction::class)
   }
}
# Transaction
Finally, our Transaction model stores the mpesa transactions for reference.
class Transaction extends Model
{
   protected $fillable = [
      'first_name',
      'middle_name',
      'last_name',
      'transaction_type',
      'customer_id',
      'transaction_id',
      'transaction_time',
      'short_code',
      'invoice_number',
      'bill_ref_number',
      'third_party_trans_id',
      'msisdn',
      'amount',
      'org_account_balance',
   ]

   public function customer()
   {
      return $this->belongsTo(Customer::class)
   }
}
🐙 See changes on GitHub (opens new window)
# Enabling the Mpesa API
Before we proceed, please note that Safaricom's M-Pesa consists of seven (7) APIs that serve different purposes. They include:
C2B (Customer to Business)
Deals with payments sent from the customer and received to your business. Channels include Paybill and Till number servicesB2C (Business to Customer)
Deals with businesses that send money directly to the customer's phone from their bulk account. Examples: Salary payment, promotion payment, business payment etc..B2B (Business to Business)
Enables businesses to pay other businesses. Similar to B2C but instead of sending money to customer's phone, it's sent to paybill or Till number.Account Balance
Responsible for handling requests for the account balance of an mpesa short codeTransaction Status
Deals with checking the status of a B2B, B2C and C2B APIs transactionsReversal
Reverses B2B, B2C and C2B M-Pesa transactionsM-Pesa Express
Initiate M-Pesa transaction on behalf of a customer using STK Push (Lipa na mpesa).
Communication with most of these APIs happens in asynchronous manner. This means that you will not receive the result showing completion of the transaction immediately. After making a valid request, the request is added to a queue and you will receive an acknowledgement.
You will need to set up a Listener / Callback URL / Webhook to receive feedback of the transaction. Depending on the transaction type and it's outcome, the feedback can either be a success or a failure.
With the theory out of the way, let's install the m-pesa php client that will enable us to communicate with the API.
composer require safaricom/mpesa
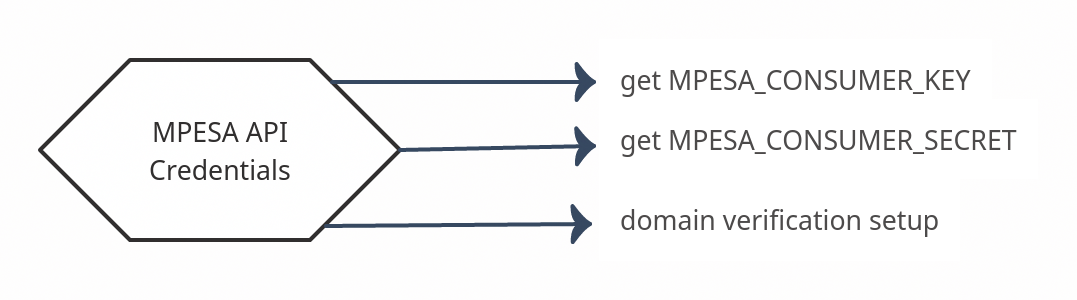
Next, we need to get some credentials from the API and whitelist a few URIs. This is a pretty long and boring setup so I've externised it into a gist that describes the entire process with a lot of screenshots.
Basically, we will end up with four environment variables MPESA_CONSUMER_KEY, MPESA_CONSUMER_SECRET, MPESA_SHORT_CODE and
MPESA_PASS_KEY
MPESA_CONSUMER_KEY=some_secret_hash_key
MPESA_CONSUMER_SECRET=some_secret_hash_key
MPESA_SHORT_CODE=
MPESA_PASS_KEY=
Before you do (or do not) go through this MPESA API set up, please note a few things:
Domain verification will be necessary when communicating with safaricom. Therefore it will not be used in the article but in part 3 of this series. However I recommend you to get it over and done with now.
I will be using
Laravel Sailto obtain a live domain to communicate with Safaricom. If you wish to do the same (because you want to try this locally), I highly recommend you to install it (opens new window). Another greate alternative isngrok. You can sign up for a free ngrok plan (opens new window) and link it to your dev environment (opens new window). If you use ngrok without any account, your server will expire after a few hours which will make you go through a big chunk of the set up again.If you've done this before and you know what you're doing: we’re going to enable the "Mpesa API".
The scope of the articles will be limited to C2B. However, we may tackle other categories in future series.
⚡️ Okay so here is the gist ⚡️
See you back in a mo.
# M-Pesa as a service
Welcome back, 👋 at this point you should be able to add the following variables to your .env file:
MPESA_CONSUMER_KEY=
MPESA_CONSUMER_SECRET_=
MPESA_SHORT_CODE=
MPESA_PASS_KEY=
within our config/services.php file, we configure a new mpesa service containing everything we need to start up M-Pesa client. It registers our environment variables but also configures some extra options.
//...
'mpesa' => [
   // live or sandbox
   'environment'            => env('MPESA_ENV'),

   // Our mpesa API credentials
   'consumer_key'           => env('MPESA_CONSUMER_KEY'),
   'consumer_secret'        => env('MPESA_CONSUMER_SECRET'),

   // till number
   'shortcode'              => env('MPESA_SHORT_CODE'),

   // till number pass key
   'passkey'                => env('MPESA_PASS_KEY'),
]
Whilst our native php client written by Safaricom is quite powerful, we will create a new App\Services\Mpesa class to provide an additional layer of encapsulation that we can control and that acts as our own representation of the interface between the M-Pesa API and our Application.
Whenever we create a new instance of that class, we will boot up an underlying php client with all of the configurations defined earlier.
namespace App\Services;

class Mpesa
{
    protected $client;

    function __construct()
    {
        $client = new \Safaricom\Mpesa\Mpesa();

        $this->client = $client;
    }
}
In order to bring all of the power of the underlying client to our M-Pesa service, we proxy all method calls to that client through the magic method __call().
class Mpesa
{
    // ...

    public function __call($method, $args)
    {
        if (! method_exists($this->client, $method)) {
            throw new \Exception("Call to undefined method '{$method}'");
        }

        return call_user_func_array([$this->client, $method], $args);
    }
# Building Our Playground
# Frontend
Before implementing the M-Pesa OAuth process, let's bootstrap our authentication.
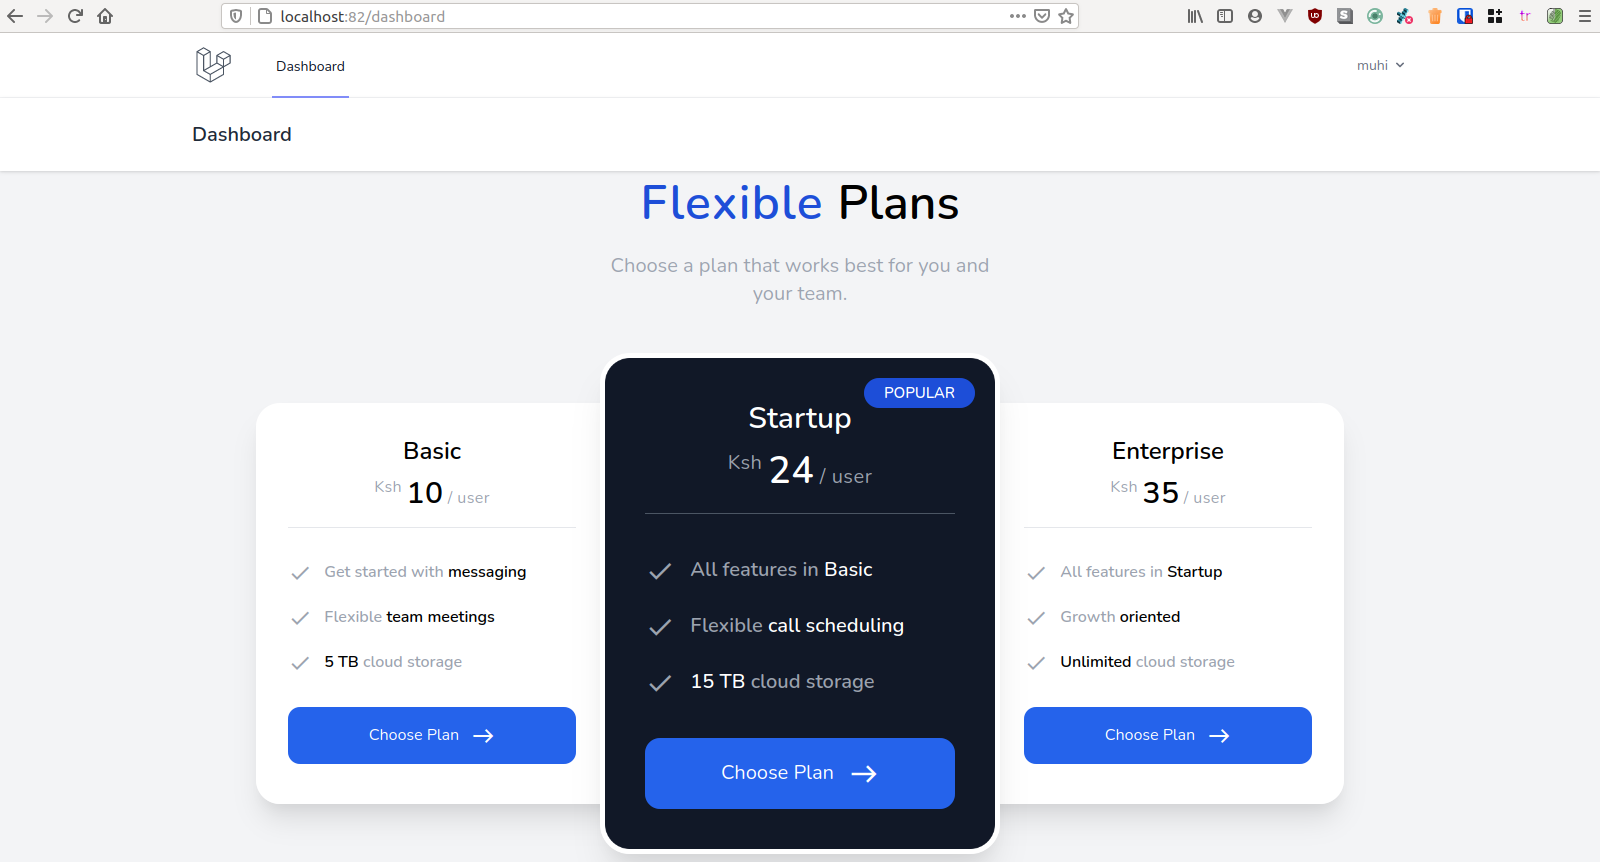
I simply installed laravel breeze (opens new window) to generate the typical authentication boilerplate, tweaked the navigation, created user account and updated the dashboard with some dummy pricing page.
All that's left to do is setting up our m-pesa OAuth process and implementing payment deduction once we choose a plan.
# Access Tokens
The M-Pesa API uses OAuth authorization framework to allow third party applications or websites access to its protected resources. Access to these resources is granted through an access token that expire after 1 hour. Let's add a little helper method in our MPesa service that will enable us to authenticate with the API.
class Mpesa
{
   //...

   public function getAccessToken()
    {
        if (config('services.mpesa.environment') == 'sandbox') {
            return $this->client::generateSandBoxToken();
        } else {
            return $this->client::generateLiveToken();
        }
    }
}
We leverage the base client to do the heavy lifting for us and generate our token based on the environment configuration.
🐙 See changes on GitHub (opens new window)
# Conclusion
When dealing with any API integration (and especially the M-Pesa API), it can be very quickly overwhelming. I've tried to make this article as complete as possible so that we can move on to more interesting things on the next ones. I still hope you had fun during that little journey and that you are excited about the new possibilities that your application can now offer.
The next article will deal with registering our callback URLs, making transactions with the API and setting up an events & listeners that will allow us to track and monitor the API.
See ya soon 👋